Vanilla Magic Custard Cake – I am sure you have probably heard or read about these magic cakes over these past few years. They are quite popular and I have seen them done in more than a few flavors in a variety of places. Today I wanted to share my fool-proof recipe for the Vanilla version of this cake. Also, you can be sure that this absolutely works because I wouldn’t share it if it didn’t!
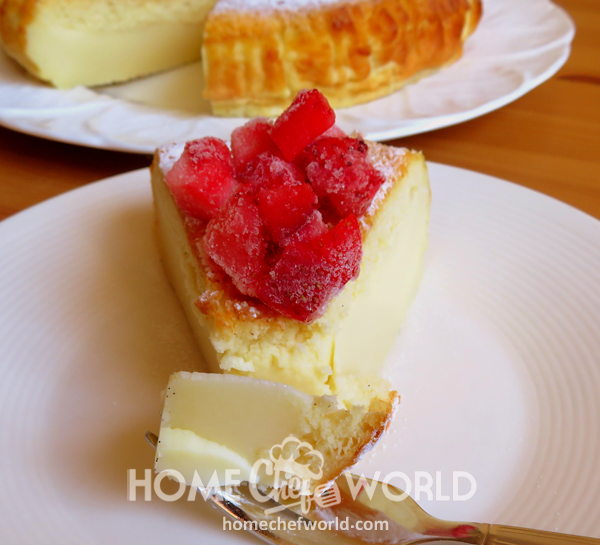
So, what is a Magic Custard Cake? It is a cake that, just like magic, separates its dough into two, sometimes three, distinct layers till the end. Not to mention that this is a melt-in-your-mouth cake! Creamy and delicious, this cake separates into a dense custard layer on the bottom and a fluffy light cake-like layer on top. However, unfortunately, I cannot tell you how it works, only that it does! That is what makes it so magical!
Therefore, the batter of the cake is very liquid, but somehow a chemical reaction manages to work to separate the liquid into layers, each one with its own texture and flavor! Isn’t this amazing!
VANILLA MAGIC CUSTARD CAKE: INGREDIENTS
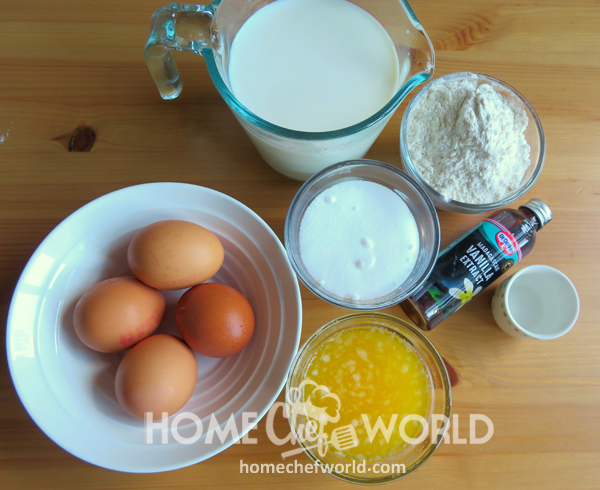
Firstly, there is nothing magical about the ingredients, to say the least. All of the magic happens in the oven! All you need are a few simple things!
[frontend-checklist name=”Vanilla Magic Custard Cake Recipe”]So, as you can see there is nothing exceptional required. Just ordinary simple ingredients and you can create your most-loved cakes and sweets.
TIPS & TRICKS TO MAKE VANILLA MAGIC CUSTARD CAKE
If you follow my hints and tips you are sure to have success with this recipe!
Preparation Tips
- First of all, read through the recipe several times to help familiarise yourself with any ingredients, steps, or equipment you will need to execute this recipe.
- Then, assemble all of your ingredients in one place prior to the beginning. This simple step can help to prevent you from leaving out something integral to the success of the recipe!
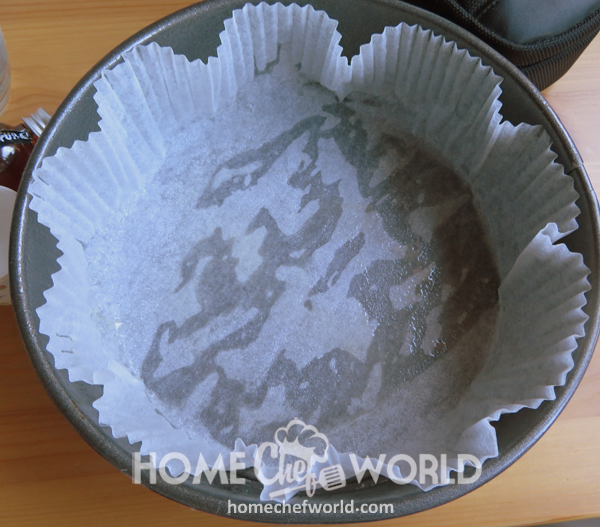
- Also, use the proper sized pan as dictated in the recipe. It requires an 8-inch round deep cake tin. I always use a metal tin and cannot speak for how it will work in anything else. Moreover, do not use any tin which is larger or smaller. The cake will only reliably turn out with the size of the pan stated in the recipe. The size of the pan is critical. You can line the buttered tin with some baking paper to help with ease of removal once the cake is baked and properly chilled. However, I use cake tin liners that look a bit like oversized cupcake liners.
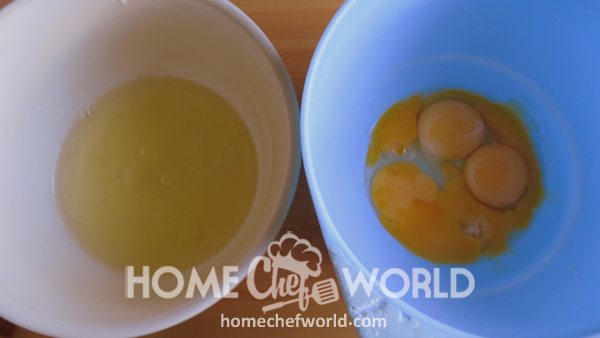
- You will need to separate the egg whites from the yolks. I always do this in a separate bowl, individually so that if you have an accident and some of the yolks gets into the white of an egg, you can discard it without tainting all of the whites. Even a small smidgen of egg yolk will impact the whites in a negative way.
- In the same light, make sure all of your ingredients are at room temperature. Your eggs can be placed into a bowl of warm water for about 10 minutes to help bring their temperature down.
Cooking Advice
- Now, the egg yolks, sugar, and water need to be mixed fully until the sugar dissolved completely. The mixture should be whisked with an electric whisk for at least five minutes so that you have a fluffy, foamy, and pale yellow mixture. This step is integral to the recipe’s success.
- In addition, make sure you thoroughly beat the butter into the batter. This will take at least two minutes.
- Once you stir in the flour and then the milk you may be tempted to think something isn’t quite right because the mixture will look a bit curdled. Don’t panic. This is how it should look.
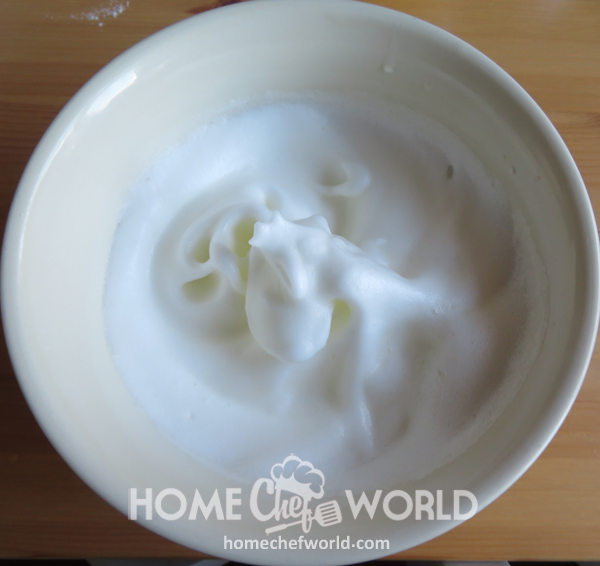
- Also, use scrupulously clean beaters and a glass bowl to whisk the egg whites until they have stiff peaks. If your beaters have even a scrap of yolk on them, you will not get the volume and stiffness of the whites as required by the recipe.
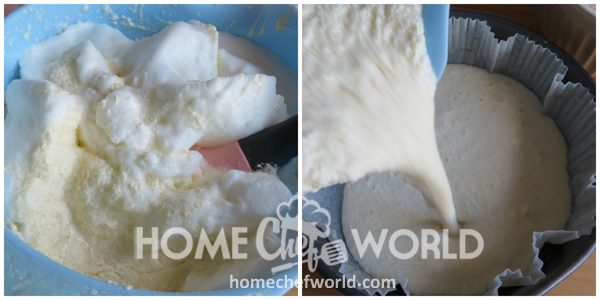
- Then, stir the beaten egg whites into the batter gently, being very careful that they don’t completely dissolve into the batter and disappear. You want a nice thin batter with some visible fluffy small white clumps visible.
- Do not try to hurry the cake up by raising the temperature of the oven. This is a rare case that needs slow baking to achieve its proper creamy texture.
- Do not over-bake this cake. You will know it is done when the sides are set, the center wobbles a bit and the top of the cake is just golden brown.
- Allow it to come to room temperature before leaving it to sit (lightly covered) and chill in the refrigerator for a minimum of four hours so that it sets up perfectly.
HOW TO MAKE VANILLA MAGIC CUSTARD CAKE
This truly is one of the easiest cakes to make. Don’t allow yourself to be intimidated by what only sounds or looks difficult!
Mixing Everything
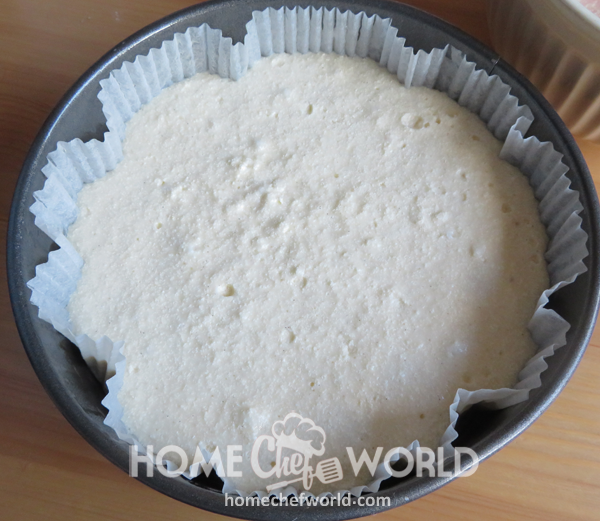
Have ready an 8 inch round deep cake tin. Butter it really well. If you like, you can line it with baking paper to help make lifting the done and cooled cake out more easily.
Now, carefully separate your eggs. As I said before, it is always a good idea to use an extra bowl for this step. You can never be 100% sure! So, why risk your sweet magic custard cake, when you can just wash a spare bowl.
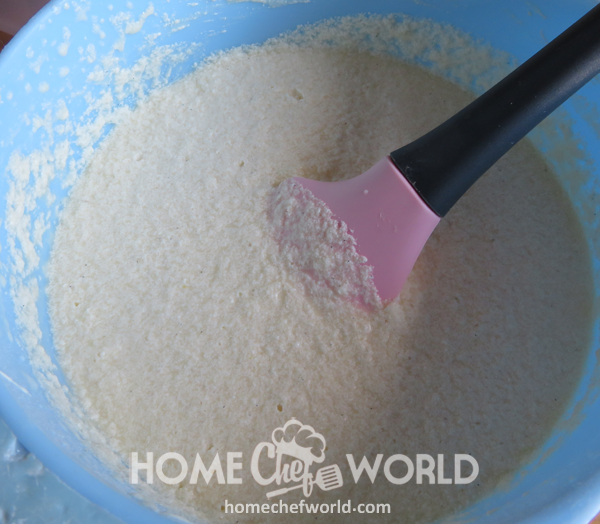
Preheat the oven to 325*F. Beat the egg yolks together with the sugar and water until pale yellow in color. Whisk in the melted butter, beating for about 2 minutes until evenly combined. Fold in the flour until completely incorporated.
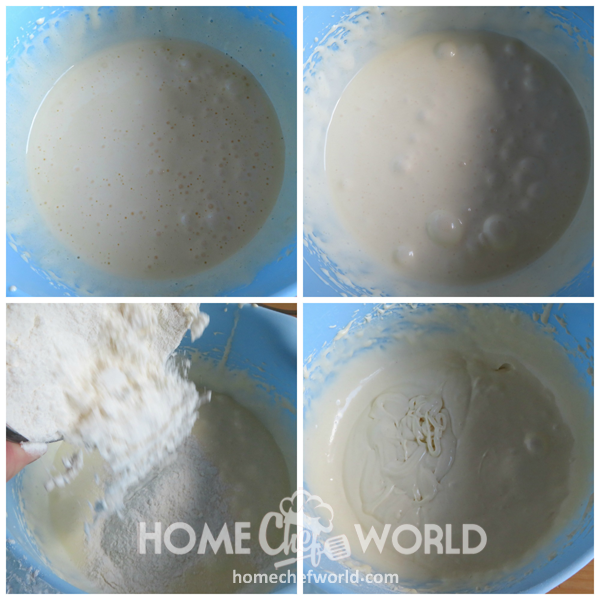
Slowly beat in the milk and vanilla. Keep in mind that this recipe takes time, so don’t rush the steps!
Then, using clean beaters whisk the egg whites until stiff peaks form, but they are not dry.
Stir these into the batter 1/3 at a time until all have been incorporated. Try not to over mix. You don’t want the whites to dissolve completely. You should have plenty of small, fluffy little clumps in the batter. Pour the batter into the prepared pan.
Cooking the Vanilla Magic Custard Cake
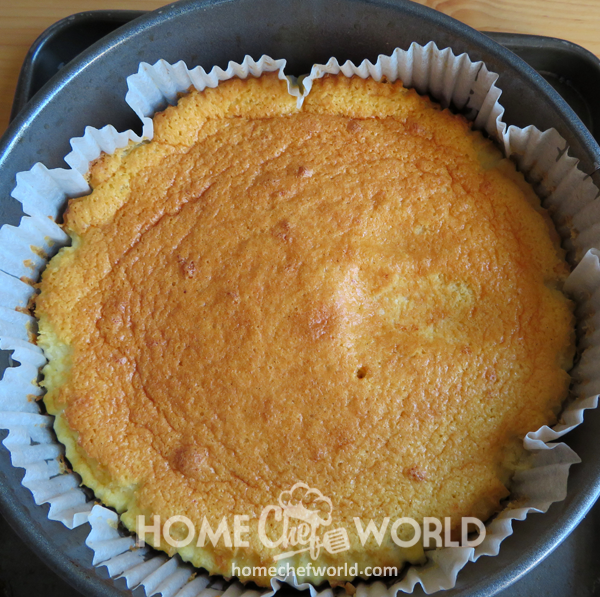
Bake in the preheated oven for 40 to 60 minutes. When it is done it will be just slightly jiggly in the center. Also, I would start checking it at 40 minutes. In addition, you can cover the top lightly with a sheet of aluminum foil if you think it is browning too quickly.
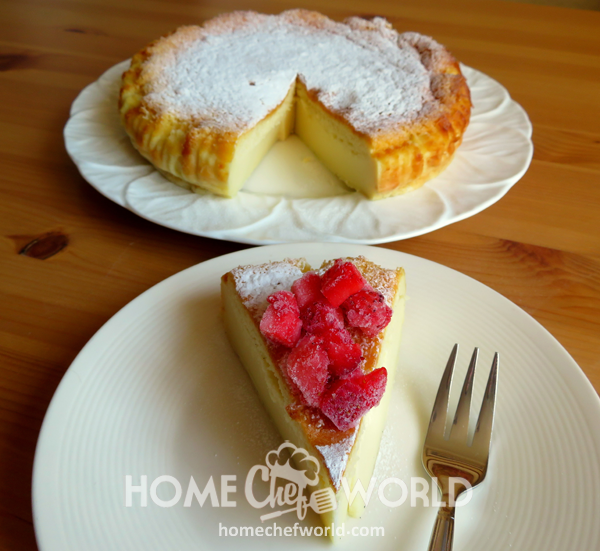
Allow cooling completely in the tin to room temperature. Then, place in the refrigerator, lightly covered, for about 4 hours before lifting out and cutting into wedges to serve.
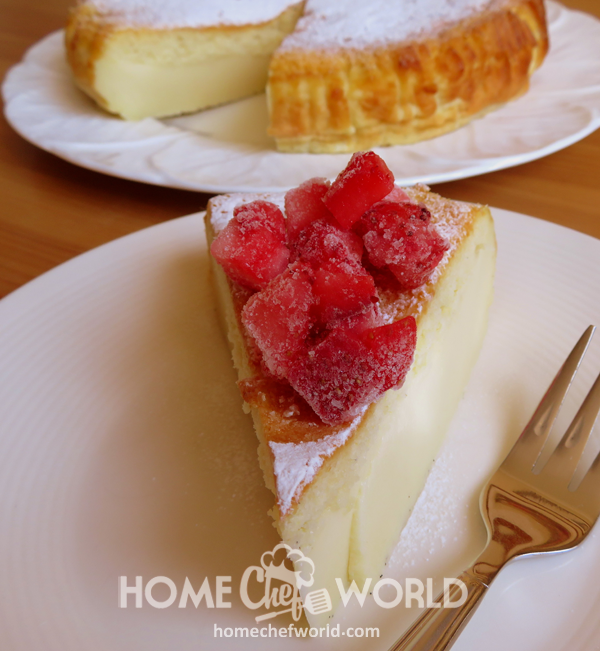
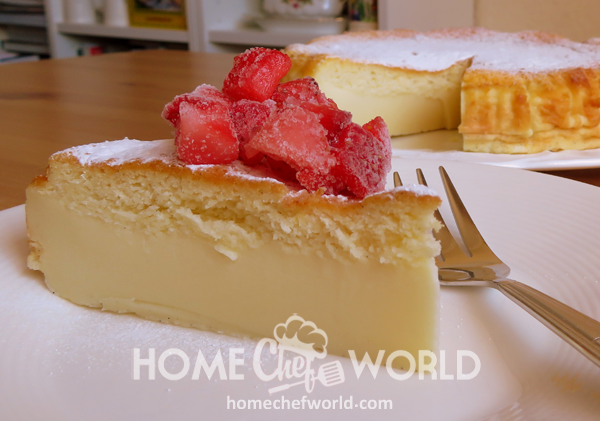
Finally, dust with icing sugar to serve. Also, fresh or frozen berries go very well with this.

The bake time can vary greatly with this cake. It can range anywhere from 40 to 70 minutes depending on your oven. It is best to test it after 40 minutes to see what it looks and feels like. The cake is done when it only jiggles slightly but feels somewhat firm to the touch around the edges.
There is no special ingredient or tricky technique needed as you can see. It is made pretty much just like any traditional sponge cake, with the main difference being that you end up with a super-thin, almost crepe-like batter. However, don’t let that frighten you. That is totally what it is supposed to look like!
SUGGESTIONS FOR SERVING VANILLA MAGIC CAKE
This is a really lovely cake that is welcome at any time of the day. It goes down wonderfully for a weekend brunch option but is equally at home as a wonderful dessert to be served after a special dinner. We really love it with fresh fruit and berries, but in the offseason when they can be hard to come by, do feel free to use frozen fruit. As you can see, properly chilled, it cuts beautifully into nice distinct wedges! You can also top it with a dollop of lightly sweetened whipped cream or squirty cream if you wish!
ENJOY YOUR DESSERT!
All in all, one thing is for sure: no matter when or how you decide to serve this lovely cake, it is sure to go down as a real treat! One simple batter. A simple layered cake. It is definitely pure magic! However, don’t trust me, go and prepare yourself to fall in love!
Last but not least, I would want to assure you that every further question you’ll have, I aspect all of them in the comments section below. So, if you encounter any difficulties in the process of preparing the Vanilla Magic Custard Cake, I’m your mate! Also, any opinion, advice, and thoughts on this recipe are more than welcome. You know that I,m always super excited to hear from you!
Vanilla Magic Custard Cake Recipe
Ingredients
Method
- 1. Have ready an 8 inch round deep cake tin. Butter it really well. If you like, you can line it with baking paper to help make lifting the done and cooled cake out more easily. 2. Preheat the oven to 325*F. Beat the egg yolks together with the sugar and water until pale yellow in colour. Whisk in the melted butter, beating for about 2 minutes until evenly combined. Fold in the flour until completely incorporated. Slowly beat in the milk and vanilla.3. Using clean beaters whisk the egg whites until stiff peaks form, but they are not dry. Stir these into the batter 1/3 at a time until all have been incorporated. Try not to over mix. You don’t want the whites to dissolve completely. You should have plenty of small, fluffy little clumps in the batter.
- 4. Pour the batter into the prepared pan. Bake in the preheated oven for 40 to 60 minutes. When it is done it will be just slightly jiggly in the centre. I would start checking it at 40 minutes. You can cover the top lightly with a sheet of aluminium foil if you think it is browning too quickly.5. Allow to cool completely in the tin to room temperature. Place in the refrigerator, lightly covered, for about 4 hours before lifting out and cutting into wedges to serve. 6. Dust with icing sugar to serve. Fresh or frozen berries go very well with this.

Marie Rayner is a retired Chef, freelance writer, recipe developer, food blogger, and Cookbook author. She makes her home in Chester, UK, where she lives with her husband, Todd, and their much beloved English Cocker, Mitzie. Her motto is “Life is far too short to eat bad food,” and her goal is to share delicious and easy recipes which anyone can enjoy and cook in the comfort of their own home.
 Crockpot Chicken Nachos Recipe